


Let’s start:
Take a look at this video. Now I know this might be basic for some but I feel it really helped me to wrap my head around the science behind the system used in these bikes. It also gives a nice diagnosis and rundown on what to look for in your clutch as you ride. Just overlook the oil references.
http://www.youtube.com/watch?v=RKzowCJG7WA
Now that we know the principals of operation, let’s look at it verbally and try to understand the parts and what to look for.
Your motorcycle clutch is comprised of an aluminum basket filled with alternating steel and fiber plates held together with compressed springs. One set of plates, usually the steel ones, is connected to the transmission. The other set, usually the fiber plates, are connected to the engine. The clutch lever actuates the clutch lifter on the right side of the engine, which pushes the clutch rod through the transmission shaft. This rod compresses the springs in the clutch on the left side of the engine so the plates move apart. All of this movement allows the clutch to disengage. This works pretty well but as the clutch wears, the plates get thinner and this lessens the spring pressure applied to the plates causing slips.
These clutches are surprisingly easy to work on. First drain the oil, remove the Clutch engine side cover (left side cover while riding the bike) and then remove the four 10mm bolts that hold the clutch springs. That’s it! Remove the pressure plate and you’re in.
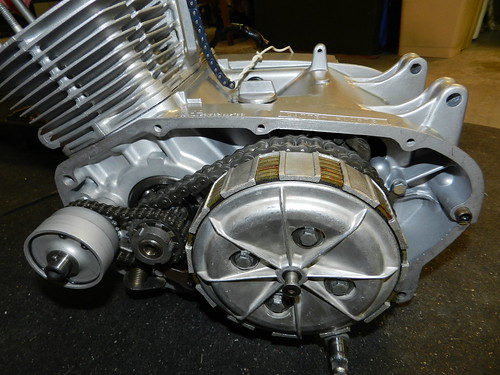
DSCN0093 by adam.corts, on Flickr
To inspect your clutch, first, measure the thickness of the fiber plates and compare that measurement to the one given in your shop manual. If they are too thin replace them. If they smell burnt something is wrong and I recommend replacing them. Turn them on edge, both fiber and steel plates. If they are warped, replace them. You can also place each one on a piece of glass and look to see it they are warped. This might be overkill because you can see it if you stack them on each other and turn them 90 degrees and look for warp. Look at the inner and outer teeth. If they are damaged or worn, replace them. I placed a new steel plate over a used steel plate and was shocked at the amount of tooth wear on just one side of the inner teeth. Look at the clutch basket and inspect the grooves the clutch plate teeth ride in. Make sure to look at both the inner teeth the steel plates ride in and the outer fingers that the friction plates ride against. If they are badly worn, you might have to replace the entire basket.
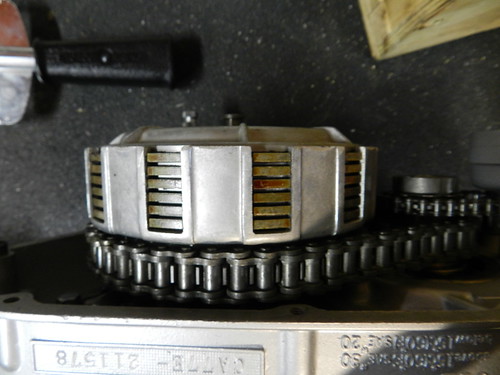
DSCN0086 by adam.corts, on Flickr
Let’s take a look at the history of clutch plates and see what we can find and see if there are better plates available to make our clutches perform better.
Honda struggled to come up with a clutch to match the engine output produced by the 305 engine. This is evident in the numerous changes made in the parts that make up these clutches. Honda came up with at least 7 different inner hubs, 3 different outers, 4 different types of plate design, a few different A plate thicknesses and a 2 different thin retaining wire setups. This makes explaining what to look for and what will fit on your clutch difficult. Please bare this in mind. Carefully examine your clutch to see what you have. I think in the following paragraphs you should be able to identify what you have and with your new knowledge, be able to select and evaluate a suitable replacement. You can always go stock but those parts are becoming supper rare and the newer parts are in most cases better technology and an improvement.
Honda experimented with 4, 5 and 6 plate clutches and different friction area on each to come up with something that would work. "Honda tried to use more narrow plates to contain the horsepower on the early machines, but finally decided on fewer (5 vs 6), but wider fiber-on-metal friction plate sets (22201-268-020), in conjunction with heavier clutch springs." (Bill Silver) This part number (22201-268-020) is what I refer to as the 020 Plate. In late 1965, Honda ended up going with the "Cush Drive" and a thick 5 plate system with wide friction surfaces. For those that want to know, the "Cush Drive" clutch added 8 – 10 neoprene washers to the rivets that mount the drive sprocket to the basket and a neoprene spacer between the sprocket and the clutch basket. This took out some of the shock and vibration in the clutch when increasing or decreasing the throttle thus making it smoother. If you can find this Cush Drive system it would be an upgrade to your bike but keep in mind that they were not perfectly round and should be turned on a lath in order to fix this condition.
Let’s look at Friction Plates:
The older friction plates were made of phenolic, a type of laminated plastic, which is topped with the friction material. Here are a few examples of the phenolic plates I have found in various bikes form 1962 – 1965. The clean one on the bottom has been bead blasted so you can see what they may look like new.
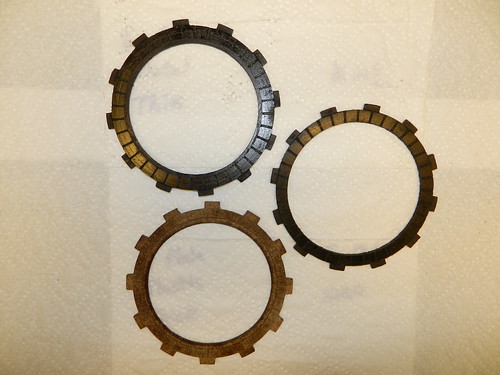
DSCN0216 by adam.corts, on Flickr
You can see on most of the phenolic plates that are removed from a used clutch, that the friction pads are polished smooth. These plates carried a lot of the generated heat and did not transfer the heat away from the clutch center. If you find these type of phenolic plates in your clutch and you’re not hard up for a 100% authentic restoration, I would get a newer design metal core plate and better friction material. Newer plates are made around an aluminum core and transfer built up heat away much more efficiently, leading to less warping problems and less wear. This was what Honda ended up with in their last revisions it came up with. They got rid of the Phenolic friction plates. I suggest you do the same when your plates are ready to be replaced.
Take a look at some of these later metal core designed plates that Honda started using.
DSCN0218 by adam.corts, on Flickr
You can see the 020 plate on the bottom and how wide that friction material was. Also look at the more modern plate on the upper right with the different groves that are now used in the 1000 cc Goldwings. Which are, by the way cross compatible with our 305’s.
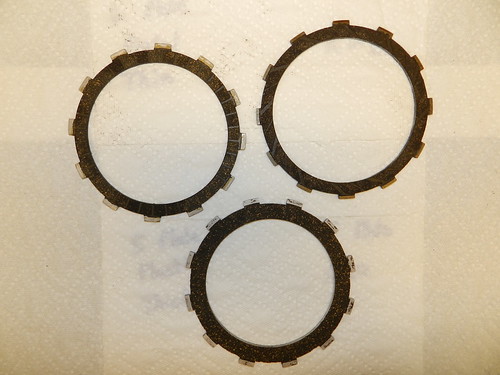
Some breakthroughs came after the 1960’s and 1970’s, so Honda was not able to incorporate them into the design but we can. One of these breakthroughs was the orientation of the friction surface. The older friction plates had a friction surface that looked like small blocks. Notice the older friction surface of the plate and the block pattern in the photo below.
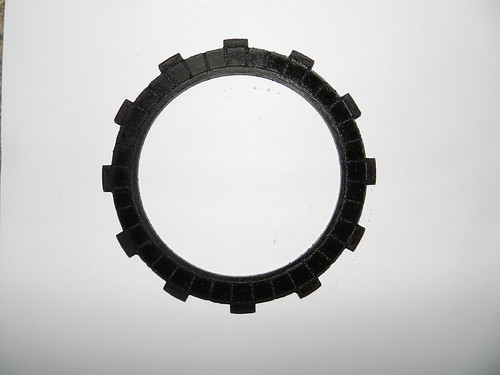
DSCN0089 by adam.corts, on Flickr
On the newer friction disks, these groves that made the block pattern are tilted, angling them away from the direction of rotation, which provides a more constant contact with the steel plates and this angled grove also allows oil to more readily leave the clutch plate face and promote a good lock up with less slip. I think this is an important enhancement that Honda was trying to address in various ways within the clutch hub.
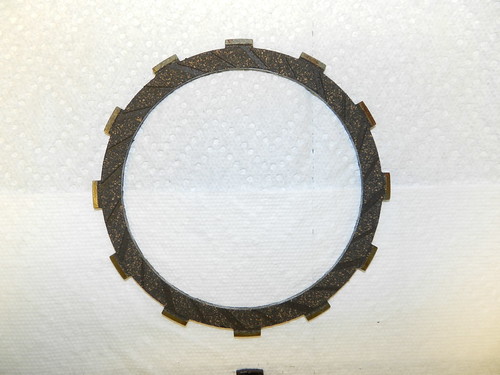
DSCN0083 by adam.corts, on Flickr
The friction surface on the new disk is a cork based product impregnated with aluminum particles to increase pad life and heat resistance. Another upgraded feature was Kevlar reinforced disks. The new friction plates are aluminum core and reinforced with Kevlar fibers, which make these friction plates even stronger than the strictly aluminum core disks Honda had access to.
Let’s look at why they decided on the 5 plate system vs the 6 plate system:
You’re going to need this formula. What we’re going to do is calculate the friction area of the friction disks and see what Honda was thinking and a possible way to improve.
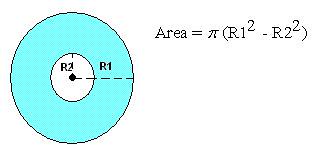
Area of a Ring by adam.corts, on Flickr
Using this formula you can see the result.
Old Phenolic 5 Plate
R1 2.755961
R2 2.362205
# of Plates 5 Friction Area = 63.31085
Old Phenolic 6 Plate
R1 2.755961
R2 2.401570
# of Plates 6 Friction Area = 68.90374
Old (Part #: 020) Larger Pad 5 Plate (A guess but not actual #'s)
R1 2.755961
R2 2.204724
# of Plates 5 Friction Area = 85.90466
New Thinner 6 Plate (K&L 17-1598) Measurements
R1 2.755961
R2 2.362205
# of Plates 6 Friction Area = 75.97302
Note: The Old Phenolic Six Plate design is a bit of a mystery. It may or may not have existed. People in the know, say it did not. If you find six plates in your clutch, chances are it was not original. Never the less people find them. The friction width on the phenolic 6 plate, from reports, is smaller than the New thinner 6 plate (K&L 17-1598). So the friction area on this new plate is better than that of the Old Phenolic 6 plate. Not to mention just a better plate all around.
Notice the larger friction area number for the (Part #:020) friction disks. Honda ended up using these friction plates on the later clutches it produced. It is my thought that Honda was able to do this because of the new stronger aluminum core disk that were used on these disks. Now I also believe that Honda could have possibly gone with a 6 thin plate clutch with the wider friction pad if they possessed this newer aluminum core Kevlar technology during their testing. The material and technology of the day, I believe was not as good and thus resulted in the decision to go with the 5 plate systems and the wider friction pads. Just a theory but it sounds plausible.
Now for you Dream fans, keep in mind that the Dream did not have the power to really hammer these clutches and test them to the full extent like the CB’s and CL’s. So a complete upgrade is not necessary unless your Dream is highly modified or contains a modified CB or CL custom engine. I do recommend the 6 plate upgrade just to take advantage of the new plate design features and to get you near the 020 friction surface area. Honda does not produce a 020 plate anymore, so I don’t know how hard the 020 plates are to find. I hear they are rare, and rare means expensive but these new plates give a close alternative to this that should work fine in most cases. Also, if you can find a thicker plate with wider friction pad that resembles the 020 design that incorporates the new features and technology of the day, than by all means this could be an even better alternative than the 020 plate originally was. Keep the forum up to date if you find a plate that matches this description.
Remember when you replace any fiber plates, take the new fiber plates and soak them in a pan of oil for an hour or two before assembly. If you are reusing the old plates you can just coat them with oil, then install.
Let’s look at the Steel plates:
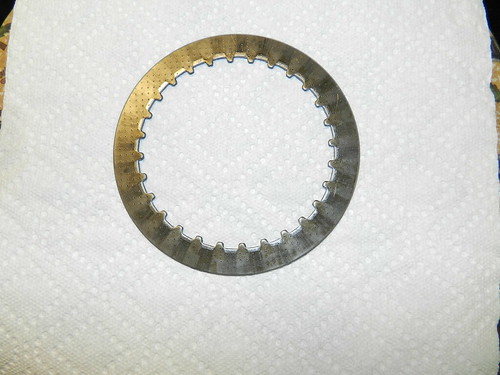
The steel plates have gone through a few design changes in hopes of improving their effectiveness over the years. Some were smooth faced, some were dimpled to promote lubrication and some were modified with relief cuts on the inside of the steel ring. Honda ended up using these relief cut steel rings for most of the 305 clutches to combat warping. I feel that this was due to the lack of heat dispersion from the older friction plates made of the phenolic material used in those earlier plate designs. Those phenolic plates would typically glaze over and polish the steel plate surface making the clutch slip.

DSCN0092 by adam.corts, on Flickr
Honda seemed to like these types of steel plates the most in the 305, so what’s with the relief cuts? Honda added 7 relief cuts into the center of the steel plate, between the teeth that fit into the center hub. As you can see in the picture, there are 7 relief cuts made on the inboard edge of the plate. The idea behind this was, as the metal plate heated and cooled these cuts would take up the expansion and contraction and not warp the plate. Without knowing the metal composition of these older plates vs the new plates offered today, I would have to say that these are the best plates to have in hard use scenarios. I do not believe that in a normally ridden bike, you would absolutely need this exact plate to see success. After all the newer bikes like the GL1000/L Glodwing 75-79 and many other later bikes use plain steel disks, with no relief cuts in them. These Goldwing disks by the way seem to be interchangeable with the 305. It is odd that the new plates used in some of the newer models did not have these relief cuts. This could possibly be due to better metal or material used in either the friction plate or the steel plate that would allow this? I don’t know but there not seen in most of the newer plates I have seen.
And finally the A plate:
As you can see from the picture it looks a lot like the B plate but does not have the relief cuts. It is also thicker than the B plate.
DSCN0095 by adam.corts, on Flickr
The A plate is the first plate placed into the clutch pack (bevel goes towards the interior of the engine) and is the backing plate for the clutch pack. This A plate, receives a lot of force and is susceptible to bending. Honda used a few different A plates, finally deciding to go with a thicker plate to combat the bending issues. Look at you’re A plates. My 1962 Dream had a thin A plate that was damaged and it looked like it matched the B plates in thickness. I almost substituted a B plate thinking it would be just as good but on further inspection the A plate was thicker by about (.004). The later A plates were thickened to twice that of the B plate to prevent bending. The A plate in this clutch design does not have a lot of backing when placed in the clutch basket so it is possible for them to bend. This bending was corrected by using a thicker A plate, so keep that in mind when you evaluating your clutch. If you have a damaged A plate in a thin 6 plate system you can use two B plates as you’re new A plate. Same goes for a damaged thick A plate, just use two thin B plates stacked on each other to make the thickness, one on top of the other if you can’t find the correct A plate. Remember a stock thick A plate is better but in a pinch this method is acceptable. You can also beef up a thin A plate with a B plate stacked on top. This adds thickness and will help spring force.
Using the thick A plate is not a bad idea because it will reduce the possibility of bending regardless of the thickness of the friction plate you decide to use. The thicker A plate will create more spring tension and increase lock up, serving the same function as adding a washer or (thicker washer) to the clutch spring retention bolt. Both increase total tension on the clutch pack by pre loading the clutch springs.
This seems like a good time to mention the springs. There are four that create the clamping force on your clutch. Now obviously, the more the better but remember you still have to be able to pull the clutch lever. The springs have a direct influence on lever pull force, so it’s a balancing act of the right amount of pressure and a lever you can live with. Here is a way to calculate the spring pressure on your clutch. The stock setup achieves about 180-210 pounds of force on the clutch, give or take the model and type of clutch you have. First stack the plates on the basket, metal A plate first. Make sure the groves on the friction disk, if you’re using the new designed friction surface, go in the direction of rotation. The clutch rotates counter clockwise so the groves should tilt away from the rotation like the lines shown here //// This allows the groves to sling the oil off the face of the Steel plate. Stack them all into the clutch alternating metal fiber metal fiber until you have (6 Steel 6 Fiber or 5 and 5) depending on the clutch your building. Measure the depth of the spring hole with the Micrometer. (24mm is what I measured) then use that measurement to set the distance on the spring compressor. Remember to include the thickness of the washer you’re using on the end of that bolt holding the spring in the clutch to set the correct measurement on the spring tester. Set the distance on the spring tester and measure the spring tension. (I got 58 lbs. per spring) Now times this number by 4 (because there are 4 springs) and you have your spring pressure on the clutch plates. You can see the springs I used are newer and an upgrade from the originals. This gave me 232 pounds of clamping force. As long as you get to that magic 180 – 210 number 180 being low, you should be good.
Can I use the two or three thin retaining spring wires with these new clutch plates? If you’re planning on rebuilding the clutch and using the same thickness and number of plates and the same A plate, then yes, the wire holes and groves should line up. Make sure to look. If you decide, for instance, to use 6 plates in a 5 plate clutch, than no because the wire holes and groves would not line up and the clutch would not work correctly and you would break the wires. Same goes for 5 plates in a 6 plate hub or a thicker A plate.
There was a myth that went around the Honda community regarding these retaining wires. The myth was that the wires would break easily and ruin a good clutch so Honda engine mechanics and racers started leaving them out. This was not true. The wires do serve a purpose. They were put into the design in order to help release the clutch plates reducing clutch drag and help in finding neutral. The wires were left out of the clutch because engine rebuilders and racers wanted to improve the clutch. These wires would not always fit back into the holes and groves after some of the upgrades (Different friction plates, Thicker A plates,. . . . . ) and if they were put back in and the holes and groves did not line up, they would break. So the myth was born. Leaving them out is not a horrible thing. I have not been able to tell a difference yet with them out.
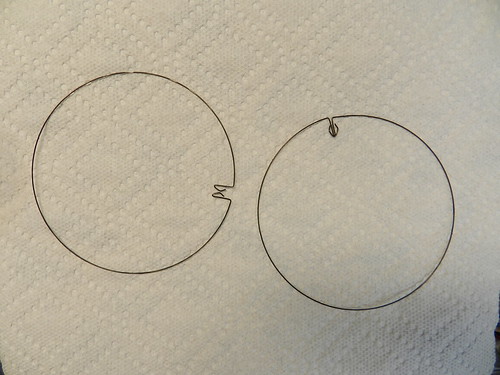
DSCN0094 by adam.corts, on Flickr
Here are the parts I used in my 65 Dream: Testing still underway! These parts are in no way the only possible solution. It is just what I had and should be a good fit in my Dream project given the numbers generated on paper. As I said, testing still in progress. Please add other options that you find that might work in these engines in the following posts. It would be great to find a modern replacement for the 020 friction plates. They are out there, they just take time to find.
Friction Plate – K&L (17-1598)
Steel Plate – Honda (22321-KA4-700)
Springs – Honda (22401-KTO-000)
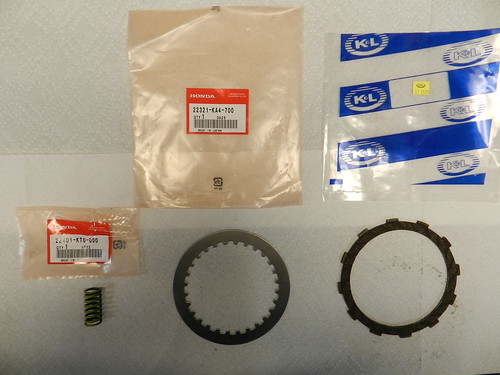
DSCN0079 by adam.corts, on Flickr
As I said above, if you can find better plates / cheaper plates or better springs please share these in the posts. With everyone looking I think we can together find the best of the best and some great choices. Availability is getting scarce and the cost of the original parts is rising. It would be nice to find alternatives that work in these 305’s. Moreover, we might just find a better solution.
Well I hope this helps people understand their clutch and make a decision on what they should or could use and what to look for. Please add information and by all means correct any mistakes. Some of the thoughts are my opinions and it would be nice to get backing or opinions by others. My words are by no means gospel. I’m learning along with everyone else and hope this post will be a vehicle to improve the knowledge of this part of the 305. It’s a start!
