


Hey guys,
I put the foot brake lever back on and when I press it down it travels further than it did before to actually engage the front brake. Do I need to pre-torque the spline on to which the brake lever slips? Is there an easy way to do that?
Thanks
honda305.com Forum
Vintage Honda Owners, Restorers, Riders and Admirers
Latest Registry Entry
1965 Honda CP77 — Ulsan Metro City, Rep. Korea
Restored with original parts — Owner: J. Doe
Brake Lever
-
paperslammer
- honda305.com Member
- Posts: 144
- Joined: Sun Aug 16, 2009 1:53 am
- Location: Palo Alto, CA
Brake Lever
'64 CA77 305 Dream
There are some contradictions here. The foot pedal does not activate the front brake, it's for the rear. If you are talking about the rear, there are 2 points of adjustment.
1. the 14mm admustment knob on the brake rod. If you are getting close to maxing that out by turning it in, then yes, you can re-index the brake arm on the splined brake cam by 1 tooth on the spline and try that.
1. the 14mm admustment knob on the brake rod. If you are getting close to maxing that out by turning it in, then yes, you can re-index the brake arm on the splined brake cam by 1 tooth on the spline and try that.
-
paperslammer
- honda305.com Member
- Posts: 144
- Joined: Sun Aug 16, 2009 1:53 am
- Location: Palo Alto, CA
Brake
Ah yes sorry I meant the rear brake. I didn't know there was a 14mm nut adjustment. I will give that a turn or two and see what happens.lrutt wrote:There are some contradictions here. The foot pedal does not activate the front brake, it's for the rear. If you are talking about the rear, there are 2 points of adjustment.
1. the 14mm admustment knob on the brake rod. If you are getting close to maxing that out by turning it in, then yes, you can re-index the brake arm on the splined brake cam by 1 tooth on the spline and try that.
Thanks
'64 CA77 305 Dream
-
paperslammer
- honda305.com Member
- Posts: 144
- Joined: Sun Aug 16, 2009 1:53 am
- Location: Palo Alto, CA
Brake Lever
Just a few questions:
I am adjusting the brake lever, and I noticed that when the foot brake is NOT pressed, the grabber that grabs the brake light switch is pretty loose:
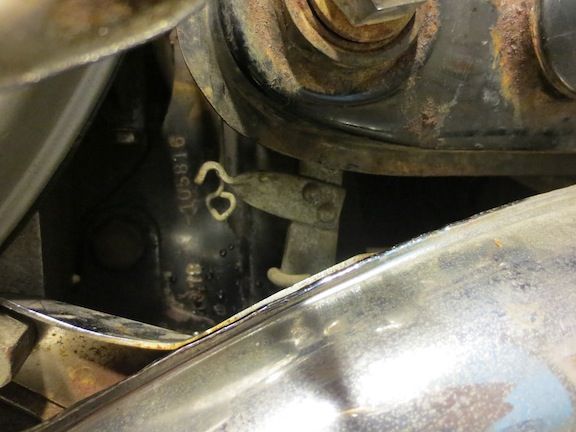
Here is the angle of the swing-arm at the back with the brake lever NOT pressed - does this look normal?
Here is the brake lever un-pressed
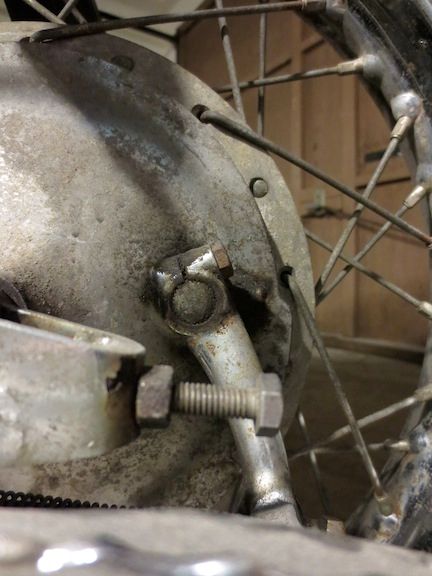
And it must be pressed this low to engage - does this seem normal? It seems like the lever gets pretty close to the ground
I am almost at the end of how far I can twist the nut at the end of the rear break rod. Should I index the rear swing arm for the rear drum break? Or do the angle seem correct? Suggestions?
Thanks all,
I am adjusting the brake lever, and I noticed that when the foot brake is NOT pressed, the grabber that grabs the brake light switch is pretty loose:

Here is the angle of the swing-arm at the back with the brake lever NOT pressed - does this look normal?

Here is the brake lever un-pressed

And it must be pressed this low to engage - does this seem normal? It seems like the lever gets pretty close to the ground

I am almost at the end of how far I can twist the nut at the end of the rear break rod. Should I index the rear swing arm for the rear drum break? Or do the angle seem correct? Suggestions?
Thanks all,
'64 CA77 305 Dream
Rear Brake
I had my first run at this last week end helping a local guy get his Dream on the road. I did not consult the shop manual because I didn't have one with me. The trick was trying to get the brake to work at their optimum and simultaneously activate the brake light. Here's what we did.
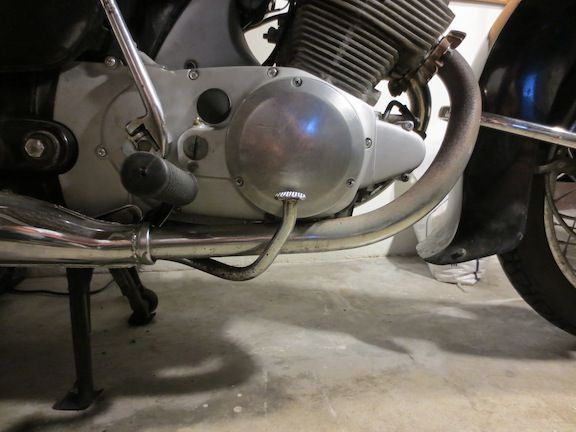
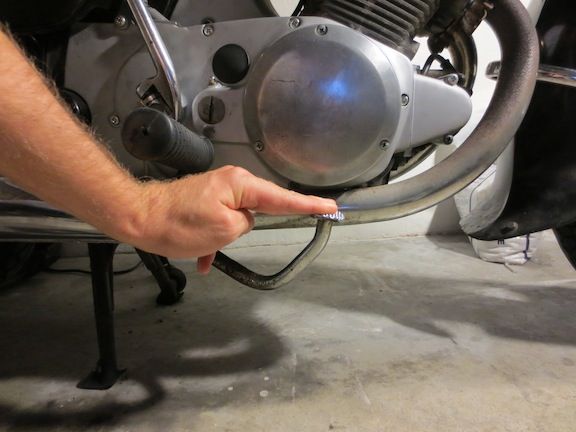
First, take the chrome brake foot lever off the right side. Then make sure the arm on the left side (that catches the little diamond on the end of the brake spring) is parallel to the ground and while holding it put the brake lever back on in about the position it will end up when everything is put back together. You will probably have some resistance from the brake spring.
Next you have to put your right side exhaust back on and get it tightened down.
After we got it all together we figured out that the chrome brake foot lever was bent. A couple blocks of wood and a pipe wrench and we got it alot closer and everything seemed to work great. The brake lever does hit the bottom of the right header pipe, but I guess that never bothered Honda.
Next check to make sure that as soon as you hit the brake, your brake light goes on. If not adjust the brake switch using the two nuts on the outside of it to move it up or down.
Finally, put the 14mm nut on the brake rod. It helps to have a deep socket. Adjust it in checking to make sure that the brake shoes are not dragging. Tighten it until the brakes start grabbing if the brake lever is pushed down about an inch. When you are done with this look at the brake arm on your hub. It should be as close as possible to 90 degrees to the brake rod when the brakes are engaged. If not, take the nut back off the rod and adjust the brake arm accordingly.
When we were done his brakes worked well and his light went on right away.
There seems to be a sweet spot when adjusting the rear brakes on a Dream. It is hard to find, but my brakes on my '65 work really well right now.
You may want to consult the shop manual as well, but we did this and everything works well.
I hope that helps.
-
paperslammer
- honda305.com Member
- Posts: 144
- Joined: Sun Aug 16, 2009 1:53 am
- Location: Palo Alto, CA
-
paperslammer
- honda305.com Member
- Posts: 144
- Joined: Sun Aug 16, 2009 1:53 am
- Location: Palo Alto, CA