Waveblaster wrote:Cheers LM
Appreciate your informed response. It will remain a true mystery.... At least I can feel confident to continue with the assembly now.
Greg


honda305.com Forum
Vintage Honda Owners, Restorers, Riders and Admirers
CB77 1964
-
LOUD MOUSE
- honda305.com Member
- Posts: 7818
- Joined: Mon Aug 15, 2005 8:23 am
- Location: KERRVILLE, TEXAS
-
Waveblaster

- honda305.com Member
- Posts: 215
- Joined: Fri Dec 27, 2013 11:13 am
- Location: Perth Western Australia
Cam chain roller guide
I managed to get most of the bottom end including clutch cover , magneto and starter installed.
I was looking at installing the roller guide. I have several to choose from , some worn and some NOS. Strangely the NOS ones appear to be quite rubbery in texture. I can bend them. I am concerned that this is not normal as the majority of the rollers feel to be made of a hard nylon type material.
Has anyone experienced this ? I am not sure if the rubbery rollers harden up with exposure to oil and heat. Or are ok to use?
regards
Greg
-
Tim Miller
- honda305.com Member
- Posts: 242
- Joined: Mon Jan 30, 2012 6:22 pm
- Location: Pflugerville, TX
Re: Cam chain roller guide
Greg,
NOS rollers should be soft, and that's a good thing. Old hard rollers can brake.
Tim
NOS rollers should be soft, and that's a good thing. Old hard rollers can brake.
Tim
Waveblaster wrote:I managed to get most of the bottom end including clutch cover , magneto and starter installed.
I was looking at installing the roller guide. I have several to choose from , some worn and some NOS. Strangely the NOS ones appear to be quite rubbery in texture. I can bend them. I am concerned that this is not normal as the majority of the rollers feel to be made of a hard nylon type material.
Has anyone experienced this ? I am not sure if the rubbery rollers harden up with exposure to oil and heat. Or are ok to use?
regards
Greg
-
Waveblaster
- honda305.com Member
- Posts: 215
- Joined: Fri Dec 27, 2013 11:13 am
- Location: Perth Western Australia
I Installed the rest of the seals for the lower case today. Fitted the kickstart mechanism Also, there is quite a bit of play in the bush that supports the kick start spindle that protrudes through the case. I previously went searching for this but never had any luck. It doesnt seem to appear as a part number. I think it will be fine I could always turn something up on a lathe in the future.
Cover was held on with case screws thanks to Tim at Classic Honda restorations. a bit of loctite 767 should ensure they are removable.
I had to reassemble the kick starter as it had been pulled apart for chroming many moons ago. I found a fiddly process getting a spare one apart for the spring and circlip.
Ended up painting the cases as soda blasting was not on the budget at this stage. Apologies to the purists but I think it should still look ok.
Fitted the NOS cam chain Idle wheel. I had a few old units and ending up placing two of the washes that sit under the circlip as the slop was considerable laterally.
Fitted the clutch cable I had two, this one is the longer one but googling the part number throws up a 1961 model? This would be 3 or 4 inches longer . I wondered whether the listing was wrong and this was for the later models with high rise bars. Anyhow I can change at a later date.
- Attachments
-
- Bottom End together 1 resize.JPG (58.25 KiB) Viewed 1438 times
-
- Bottom End together 2 resize.JPG (52.12 KiB) Viewed 1438 times
-
Waveblaster
- honda305.com Member
- Posts: 215
- Joined: Fri Dec 27, 2013 11:13 am
- Location: Perth Western Australia
So I have made a fair amount of progress. I have the engine together after battling with the timing chain. I ordered a new chain and link and additional links from a second supplier. I was under the impression they were the clip type but it seems that most are now the peened link variety. I tried to cheat and use an old clip and link but the new chains are a smaller diameter. I eventually had to use the peened variety and carefully bruised the end with a series of small punches while supporting the back of the chain. The chain was also very tight and I dropped it in a number of times trying to take up enough slack? to get link in. I am glad that exercise is over.
We had a beautiful sunny winters day here in Perth and I was able to get some more spray painting done. I painted the guards and side covers in silver. I finished with a two pack clear which really brings up an although not technically original , fantastic shine and depth.
I am now attempting to get the front forks back in. I recall having to use a bit of persuasion to get them out which include spreading the lower triple clamp and a rubber mallet.
Can anyone recommend the best way of getting back in given everything is freshly painted? would it be easier to drop the whole triple tree out and insert the two fork legs?
regards
Greg

Greg
Good progress. For the forks, I would drop the triple clamp, then thoroughly clean the bores in the bottom clamp. Just clean all of the rust and paint back to bare metal. The stanchions will slide in much easier then.
I went from this....
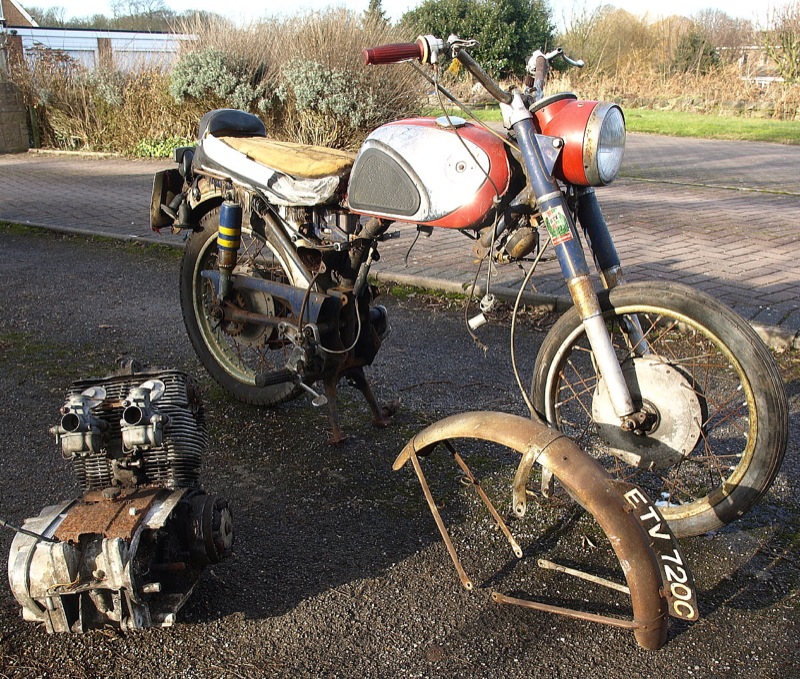
CB77 straight out of the car by graham.curtis, on Flickr
To this

CB77 Front Forks by graham.curtis, on Flickr
Good progress. For the forks, I would drop the triple clamp, then thoroughly clean the bores in the bottom clamp. Just clean all of the rust and paint back to bare metal. The stanchions will slide in much easier then.
I went from this....
CB77 straight out of the car by graham.curtis, on Flickr
To this
CB77 Front Forks by graham.curtis, on Flickr
'60 C77 '60 C72 '62 C72 Dream '63 CL72
'61 CB72 '64 CB77 '65 CB160
'66 Matchless 350 '67 CL77
'67 S90 '77 CB400F
'61 CB72 '64 CB77 '65 CB160
'66 Matchless 350 '67 CL77
'67 S90 '77 CB400F
-
Waveblaster
- honda305.com Member
- Posts: 215
- Joined: Fri Dec 27, 2013 11:13 am
- Location: Perth Western Australia