honda305 Home honda305 Auctions honda305 Gallery honda305 Forum


honda305.com Forum

Login
□ Search
□ FAQ 
□ 
Vintage Honda Owners,
Restorers, Riders and
Admirers

1964 Honda Dream CA78 Rebuild-storation

Want to keep a Restoration Log? Post it here! You can include photos. Suggested format: One Restoration per Thread; then keep adding your updates to the same thread...
Post Reply
User avatar
Bob750
honda305.com Member
Posts: 233
Joined: Wed Jun 27, 2012 6:41 pm
Location: Long Beach, CA

1964 Honda Dream CA78 Rebuild-storation

Post by Bob750 » Wed Mar 06, 2013 4:59 pm

Hello everybody! A little background... (Or if you just want to get to the meat, scroll down to where it says " >>> Skip to here. <<< "

Since 1994 I've been riding my 1974 Honda CB750 K4 which I purchased from the original owner at 16K miles. Today it has over 41K. I've done a little work on it but nothing too deep, and I've kept it 96% stock (just paint, mirrors and a 4-into-1). In September 2009, I got married, and my wife eventually became tired of riding on the back and wanted to ride her own machine. So she took the MSF Rider Course and got her M1 license. After shopping for bikes with a low seat height (she's 5-3), in the first week of August 2012, we bought a 1965 Dream 305. She was drawn to the very unique lines and character, and it grew on me too--though I feel I'm a bit more of a Superhawk guy, but hey, it's her bike, not mine. I like it more and more, though.

Our bikes the last time they were out together before the tear-down:
Image

Now, you may have noticed that the model year in the above paragraph is different than the one in the title. That is because when we went to look a the bike in Ventura, CA, (we're in Long Beach, CA 85 miles south), the title the PO presented said 1965, and that's what we were there to see--a '65 Dream. The frame and engine numbers on that title matched those on the bike and his name matched his photo ID and the title. After a test ride and verification that everything worked, we bought it, after all, we had traveled all this way with a borrowed M/C trailer...

See, we didn't want a “project.” We wanted a rider, you know, so my wife and I could ride together on our own bikes. We had found honda305.com while looking for info on these cool vintage bikes. But it wasn't until after we had the bike in our garage that we found out about Bill Silver. We immediately discovered, based on his material and the actual serial numbers on the bike, that this was not a '65, which would have made parts a little easier to ID and come by. We had not only a '64, it was an EARLY 64. After the “holy sh#t” moment wore off, we knew this would need to be corrected during registration.

We registered the bike with DMV as-is, so we could legally ride it. So DMV needed CHP to do a VIN check. We provided the pertinent pages from Bill Silver's book to the VIN officer. And after he did his research he agreed with us; this was indeed an early 1964. DMV then gave us a new blue on white plate which looked even funnier on the bike than the yellow on blue one it came with. (Apparently the '65 error must have happened in the 70s for it to have that blue plate.) [EDIT: I've since learned that there may not have been an error in titling as in Calif., many vehicles are titled when they are first sold. But the bike has fallen out of the DMV's system at least twice (once now, once prior to 1982, when it got the Blue plate.) /EDIT] We bought a gorgeous, restored gold on black 1964 YOM plate off eBay, paid the extra DMV fee to have the black plate transferred to our new, edited title. Things were looking up... and much more “period!”

While the registration stuff was happening, we rode it around and had a couple issues with tank fluff alternately clogging the float valve, starving the engine of fuel, and then blocking the float valve from closing, causing fuel to leak out and make the bike look like it was “lifting a leg” right there in public. During the carburetor servicing I noticed that the float was dripping more fuel that it should have been, and then I saw the tiny holes. A new float in the clean carb with new packing, and it ran much better than it had days before. An elusive loose condenser wire connection prevented it from starting for a frustrating two weeks (barrel connection looked complete, but wasn't!). The stiff clutch and hard to find neutral was alleviated somewhat by a new clutch cable and a fresh set of Barnett plates and disks with new Honda springs. And things were pretty good. For a time.

We've put about 230 miles on it and two oil changes to clean things out--one about 10 miles after we bought it and another 100 miles later. It seems to be getting about 100 MPG. Strange things started to happen, however. Downshifting into 1st caused the kick start lever to graze my calf and ankle and slam into the top of the right muffler, denting it. Luckily I hadn't put on the new mufflers from Classic Honda Restoration yet! It was quite a startling moment. But then it happened again. I removed the kick start lever. Intermittently the shaft would still move on it's own. We adapted by not downshifting to 1st until just about to a stop. Finding neutral was also sometimes difficult. Then it would occasionally jump out of and back into gear when accelerating from a stop in 1st. It would also occasionally seem to find a false neutral when shifting from 3rd to 4th. After consulting with MrHonda and the forums for advice, I decided it was time to tear into the engine.


>>> Skip to here. <<<

Now that the engine is apart, I am seeking more advice and opinion from the wiser eyes on this board to let me know if some of these engine components are serviceable or should be replaced. I'll present photos that best show areas of concern in hopes some of you can confirm or placate my suspicions.

EDIT 4/12/13: I have since received replacement parts (some NOS, some good used, from several sources) for the following units, so I'm removing some of the photos... /EDIT

After cleaning the parts, the most obvious problems seem to be with the following parts. I need to know which ones I need to source before I reassemble. Please note that in addition to the images I've posted here, it's a public photo album; so feel free to browse the pics and provide any feedback you think is warranted. I'll greatly appreciate it!!

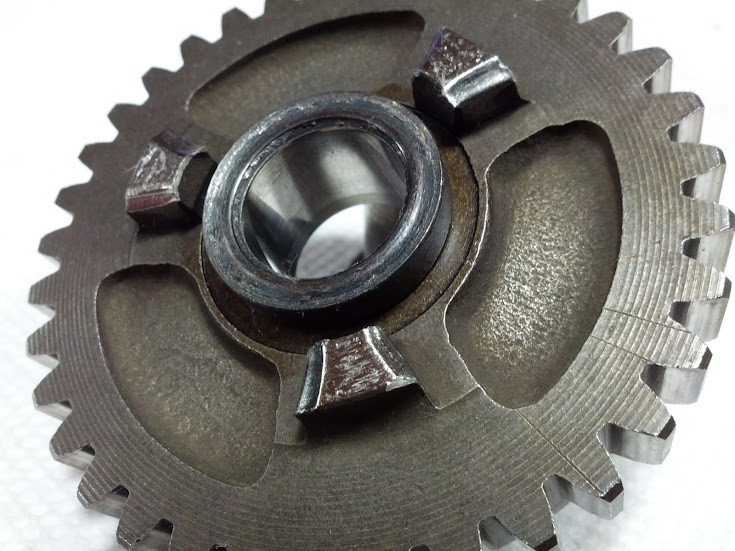
Low Gear 35T 23420-253-000 – Obviously rounded dogs and rough-worn surfaces. I've already won an auction for an NOS replacement (23420-253-020). LM thinks that there should be no issue using the newer part number. If there are issues, I'll get a -000 part. My concern with this part is that there is wear that is not smooth, like galling on both sides of the gear and on the Kick Start Spindle where they meet.
EDIT: The NOS replacement part I received from an eBay seller was actually a mis-identified 34T from some other transmission, so I returned it and got a good used -000 part from a member here. /EDIT
Image

Kick Start Spindle 28250-259-000 – Has what seems to me to be non-standard wear and gouging. Don't want to have to but will buy a new one if needed.
EDIT: Got a NOS one from eBay. /EDIT

Kick Spindle Pawl 28255-250-020 – Is it worn enough to warrant replacement? I think so, but I've seen pics of worse ones.
EDIT: Replaced with NOS one from eBay. /EDIT
Image

Kick Spindle Metal Bushing 28258-359-010 – What about those circular marks?
EDIT: Replaced with NOS from member. /EDIT

Drive Sprocket – It may be hard to see in the (deleted) photos, but there is some wear on one side of the teeth. Should I flip the sprocket over or source a replacement?
EDIT: I'm going to use this until later when I will replace both sprockets and the chain all at the same time, because the rear sprocket is not in that great of shape. /EDIT

I also have a repro Bushing C from Classic Honda Restoration that will replace the stock one. The new one has a thicker ridge. (See photo.)
Image

Shift Forks - What do you think?
EDIT: All good. Deleted Photo. /EDIT

Main Shaft - Pitting. Keep or replace?
EDIT: Replaced with good used from member /EDIT

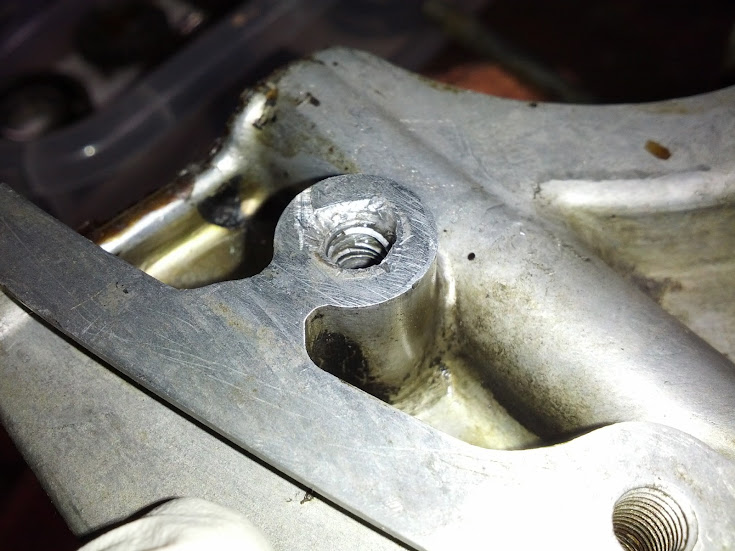
There's some case damage, but I think it's minor. Link to the pic and use the left and right arrows to see the other 8 images adjacent to this in the album. Any of these cause for concern? I know that these happened during or before my PO's ownership and likely before the last time the cases were split. This pic shows two bits of damage: 1 in the crank bearing boss, and 1 in the "wall" between the crank area and the transmission area.
EDIT: It has been determined that none of these instances of damage are problematic. /EDIT
https://plus.google.com/photos/10969791 ... 5159492546

Other Questions:
Can the crankshaft sections be easily separated for cleaning & inspection? Does it require special tools/techniques? Just tugging on them hasn't worked. Though the right hand end's roller bearing came out fine of course.
EDIT: No. Leave it together; just clean out the crud catchers in the counterweights. /EDIT

The valve train is still in the head. Pistons, domes and valves needs decarbonizing. How about a self-rebuild? I'm a recently certified A&P. But I lack many specific tools and machinery in my garage that I would want to use in order to do the top-end rework.
EDIT: Sent it out to LM... /EDIT

...snip...

Thanks for your time, interest and advice!

Bob
Last edited by Bob750 on Thu May 28, 2015 10:55 am, edited 10 times in total.

48lesco
honda305.com Member
Posts: 721
Joined: Tue Mar 06, 2007 1:45 pm
Location: Olmsted Twp, Ohio

Post by 48lesco » Wed Mar 06, 2013 9:01 pm

Bob - Went through your pictures and nothing looks too out of the ordinary but someone's been in there before you. I see .25mm (1st oversize) pistons in pic 39 and one set of offset cotters in pic 52 and 53, stock cotters in 51. I would replace 1st gear, kick spindle, and bushing on that side. Bushing on the other side looks OK but check the rollers. It's usually the kick spindle that wears there. You've already got the 14mm bushing for under 1st gear. There's controversy over the proper way to install that, but I always put the oil hole under 1st gear. That starter pawl is worn too, I'd replace it. Your mainshaft isn't too bad, but if the pitting makes you uncomfortable, they're not that expensive. The part that wears there is the brass in the top gear that chamfers in and increases the end play. That part is usually available for cheap too. Shift forks are probably OK, most of them wear where yours are worn. I'd take them out though and put them on a flat and compare them to check for bent. When you reassemble the trany into the top case, you can run it through the gears and check engagement. You may want to get another set of offset cotters. Case damage I see is not of concern. Need a new tabbed lock washer on the crank. The sprocket looks OK to me and you can always replace that later. You seem to be off to a good start, and it's not a GE90, so you can live with a little corrosion and wear in places. Use the search function in the yellow left margin, and if you don't find a suitable answer, post away! I'm willing to help by phone too if need be. I can sure talk a lot faster than I can type... Good Luck!

User avatar
Bob750
honda305.com Member
Posts: 233
Joined: Wed Jun 27, 2012 6:41 pm
Location: Long Beach, CA

Post by Bob750 » Thu Mar 07, 2013 2:06 am

Thank you 48lesco! You've confirmed many of my thoughts. I do have a couple clarifying questions/curiosities, though. I've responded within your quotation.
48lesco wrote:Bob - Went through your pictures and nothing looks too out of the ordinary but someone's been in there before you. I see .25mm (1st oversize) pistons in pic 39 and one set of offset cotters in pic 52 and 53, stock cotters in 51.
How can you tell from those photos that the pistons are 1st over? I noticed the offset cotters during disassembly; I'll need to review my Bill Silver documentation on those to understand exactly how they're used.

I would replace 1st gear, kick spindle, and bushing on that side. Bushing on the other side looks OK but check the rollers. It's usually the kick spindle that wears there.
I have a new 1st gear on the way. I'll shop spindles and left (pawl) side bushings. As for the right side where the rollers are, what specifically should I check the rollers for? The spindle itself has no discernible wear there (but I haven't mic'd it yet). As far as I can tell the rollers and counter shaft where they reside look good.

You've already got the 14mm bushing for under 1st gear. There's controversy over the proper way to install that, but I always put the oil hole under 1st gear.
That's how the assembly is illustrated in the parts manual, with the hole under 1st.

That starter pawl is worn too, I'd replace it. Your mainshaft isn't too bad, but if the pitting makes you uncomfortable, they're not that expensive. The part that wears there is the brass in the top gear that chamfers in and increases the end play. That part is usually available for cheap too.
I think I see some of that chamfering in the brass, and I even see what looks to be a tiny crack at the edge of it.

Shift forks are probably OK, most of them wear where yours are worn. I'd take them out though and put them on a flat and compare them to check for bent. When you reassemble the trany into the top case, you can run it through the gears and check engagement. You may want to get another set of offset cotters. Case damage I see is not of concern. Need a new tabbed lock washer on the crank. The sprocket looks OK to me and you can always replace that later. You seem to be off to a good start, and it's not a GE90, so you can live with a little corrosion and wear in places. Use the search function in the yellow left margin, and if you don't find a suitable answer, post away!
Maybe I'll see if I can retrofit a turbofan into the frame and just skip the transmission rebuild... :-) Funny the Google search works much better than the one at the top of the forum.

I'm willing to help by phone too if need be. I can sure talk a lot faster than I can type... Good Luck!
Thanks again for the help!

Oh, BTW, do you think I should remove this and see why it was "repaired" this way? There is no lock washer in there and maybe that's why the "repairer" did that. Kind of cracks me up. The rubber on the tensioner is good.
Image

-Bob
Mine: '74 CB750 K4 -- Hers: '64 CA78
Had: '75 CB550 K, '79 CT90

48lesco
honda305.com Member
Posts: 721
Joined: Tue Mar 06, 2007 1:45 pm
Location: Olmsted Twp, Ohio

Post by 48lesco » Thu Mar 07, 2013 10:57 am

If you look closely at pic 39 (top of one of the pistons, I think I see a .25 stamp. Should be on both pistons and that's how the oversized ones are marked; .25 .50 .75 and 1.00. If you measure the skirts at the bottom (90-deg to the pin) they should be about 2.372" for the 1st oversize or "S1" as they're sometimes referred to.

The offset cotters shift the stationary gears on both shafts towards their mating gears to increase dog engagement in 2nd and 3rd gear. In your case presently, only one of those. There's a lot of parts in play here that determine exactly where the sliding gears end up; from the shift drum and it's half-moon retainer to the forks, pins, rollers, shafts and gears, there must be a dozen parts that wear a little and conspire to reduce dog engagement when you shift gears. I think that's why they offered the offset cotters. If you replace everything else, you theoretically wouldn't need them.

The rollers are probably OK if they're not scored or pitted especially if the kick shaft looks OK in that area but I would still replace that kick shaft due to the wear on the other side.

If you ask Mr. Silver, he swears it goes the other way and I don't think it really matters. Either way the spiral drags oil into the countershaft and first gear is in a bath.

On the primary tensioner; I remember that discussion from a while ago, forgot it was you... Yes, I would take it apart and reinstall it properly; that's not the greatest place for a jumble of safety wire. Just a spacer and a bolt; manual shows a lock washer but I've never seen a lock washer there, only a flat washer sometimes.
-48

User avatar
Bob750
honda305.com Member
Posts: 233
Joined: Wed Jun 27, 2012 6:41 pm
Location: Long Beach, CA

Post by Bob750 » Fri Mar 08, 2013 2:25 pm

Poop.

Okay, so I went ahead and cut off the wire. The bolt turned easily on its way out and felt loose in the hole, tolerance wise. Once the bracket was off I saw a badly damaged Heli-Coil. There was even a piece of the insert on the threads of the bolt, which itself seems in fine shape.

I know in my heart that the right thing to do is remove the old insert, clean the hole, re-chase the Heli-Coil threads and put in a new insert. I guess I need to buy a kit. I should probably get a nice versatile kit to do more than just the M6 holes right? Also this is a fine pitch, not coarse, right?

Image
Mine: '74 CB750 K4 -- Hers: '64 CA78
Had: '75 CB550 K, '79 CT90

48lesco
honda305.com Member
Posts: 721
Joined: Tue Mar 06, 2007 1:45 pm
Location: Olmsted Twp, Ohio

Post by 48lesco » Fri Mar 08, 2013 3:48 pm

Well, I'm glad you took that apart. Hopefully there's enough meat in there to grab a new helicoil. That's a standard M6x1 thread that you can get a Heli-Coil kit for anywhere. I'd check to make sure the spacer has enough surface on that boss to tighten against; it looks pretty rough. You could try a washer there, but that would misalign the roller and chain slightly. If all else fails, those bottom case halves are pretty common on ebay...
-48

User avatar
Bob750
honda305.com Member
Posts: 233
Joined: Wed Jun 27, 2012 6:41 pm
Location: Long Beach, CA

Post by Bob750 » Sat Mar 23, 2013 2:45 am

Just an update...

With some parts from 48lesco and Loud Mouse, my transmission should be ready to go. I'm going to order a Heli-Coil kit to fix that hole and maybe a couple others... Then I'm going to send LM the top end for him to do his magic. In the meantime, the front end is coming of so I can replace the steering head bearings as there's a bad detent on center. Four new races and 37 balls on hand.
Mine: '74 CB750 K4 -- Hers: '64 CA78
Had: '75 CB550 K, '79 CT90

Post Reply


CB-77 | CYP-77 | Road Test | Riding Log | Literature | Zen | Marketplace | VJ Survey | Links | Home